Survey School 3: Create personalized surveys with logic
Your customers want to feel special. The best way to make their survey experience special? Personalization. Logic is the key to responsive surveys that make them feel like a made-for-you conversation—not an interrogation. Learn how to use logic to create a tailored survey experience.

Contents
“I'm the center of attention. My opinion is highly valued. Everyone wants to know what I think.” That's how survey-takers should feel when they fill out your survey.
They expect you to refer to them by name, to ask relevant questions, to personalize their experience so they feel like you actually care about what they have to say.
They know they're doing you a favor by providing feedback and invaluable insights into their thoughts and opinions about your brand.
Imagine their disappointment when a survey feels robotic, irrelevant, and not even a little bit personalized.
Deloitte found that roughly three out of four consumers are more likely to purchase from brands that deliver personalized experiences.
And yet, so many businesses use standardized forms or surveys to gather lead information, market data, and customer feedback.
Want to create an engaging survey experience and get the best ROI possible? You can’t use surveys that make people feel like they’re filing their taxes.
Create responsive surveys that adapt the survey experience based on each survey-taker's answers instead.
Your survey should feel natural—like a conversation—not an interrogation. Logic lets you do that. We're exploring what logic is and how it works, how to use it, and logic best practices to build better surveys.
What’s logic?
.webp)
Logic is one of the best ways to subtly personalize the survey experience because it steers people through the survey based on their answers. Think about it like, "if this, then that."
Let's say you're collecting customer feedback about a recent purchase. One person gives you two stars while another rates you a perfect 5 out of 5. Logic lets you direct each survey-taker to a different follow-up question automatically.
Or maybe you want to see what customers think of your product, specifically your latest feature release. But if they haven't tried it yet, they don't want to answer a lot of irrelevant questions about it—they'll likely abandon the survey.
In this case, a simple logic rule that directs survey-takers to question 5 if they answer "No" lets them skip the unnecessary questions (without them ever knowing they were there).
And that’s survey logic: the art and science of guiding survey-takers through a survey in the most efficient, relevant, and personalized way possible.
Take a look at a few of the many benefits of adding logic to your surveys.
1. You engage survey-takers instead of overwhelming them
No one wants to sit down and fill out a never-ending, tedious survey. But you increase your chances of completion drastically with a personalized survey that asks only relevant questions and takes a few minutes or less to fill out.
Logic tailors surveys by directing survey-takers to the next right question based on their previous answers. Instead of forcing them to jump around the survey themselves, logic automatically routes them to questions that make sense for them to answer.
And, most importantly, logic lets you keep your surveys short and to the point—surveys with six questions or less see higher completion rates.
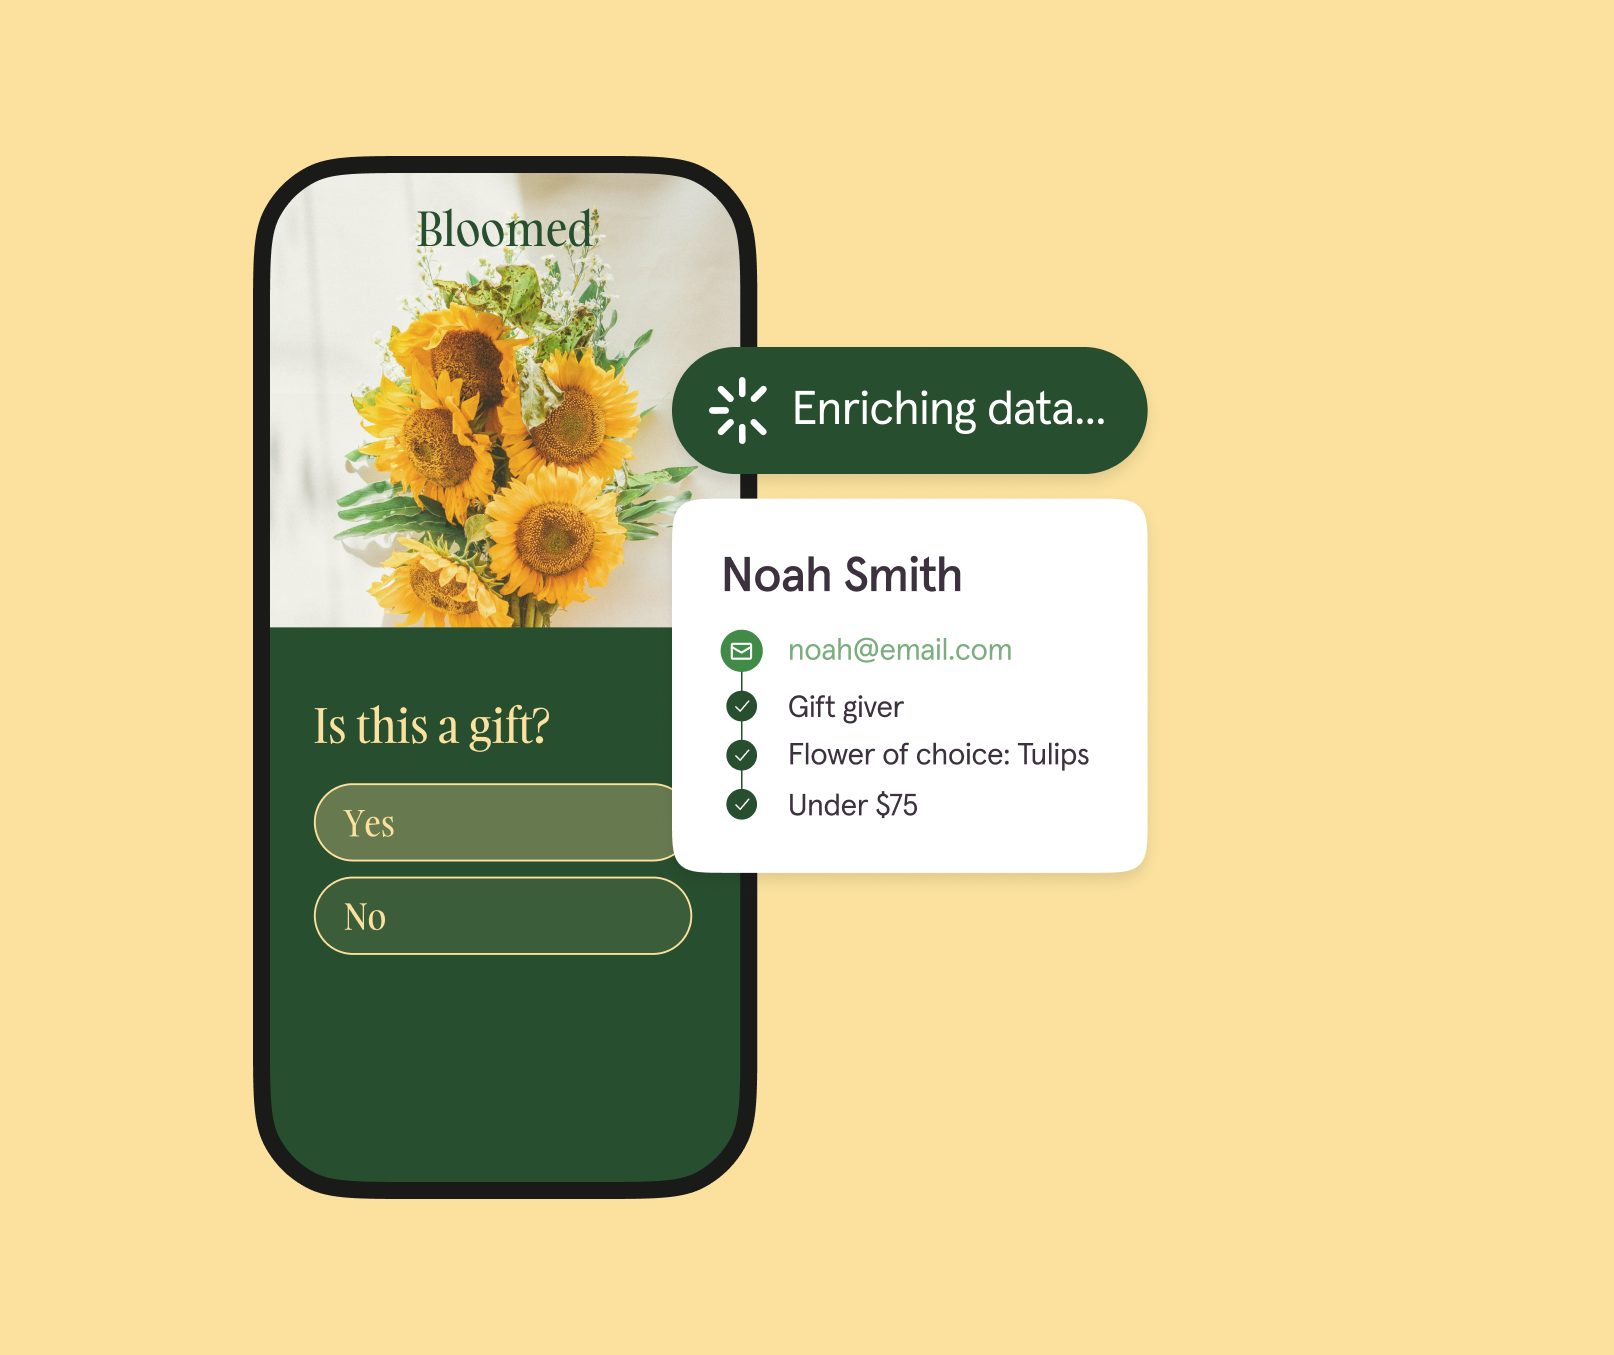
Let's say you sell flowers. You have a product recommendation quiz that helps them decide which bouquet suits them best and allows them to buy straight from the quiz.
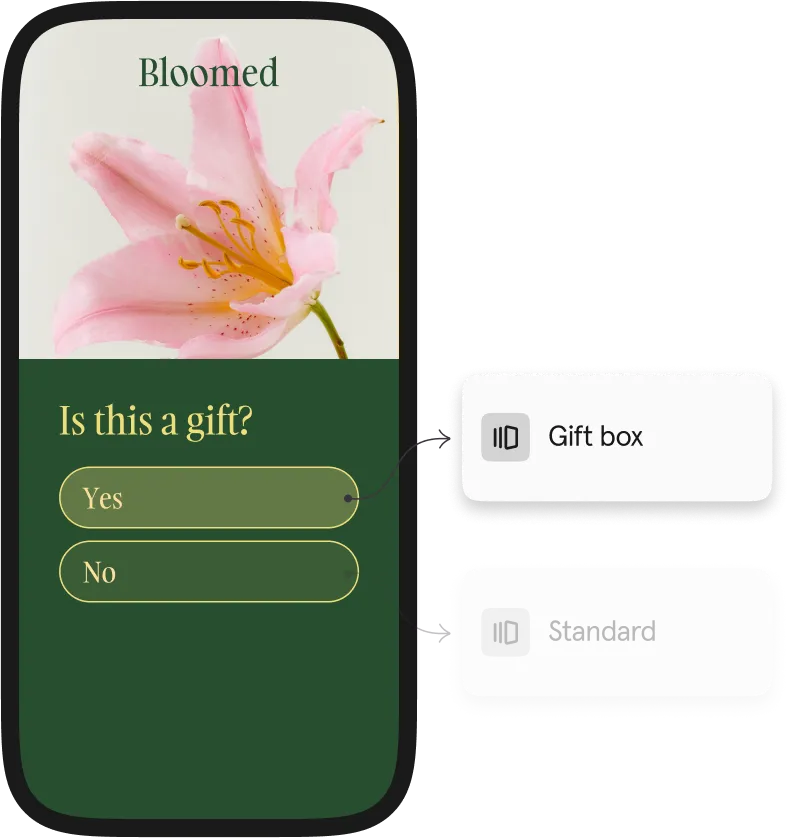
Once someone selects their bouquet, you can ask them if it's a gift to direct them to the right follow-up questions about packaging and a message for the card. Without logic, quiz-takers would have to skip through the questions, adding unnecessary friction.
2. Your survey feels more like a friendly conversation
People aren't one-size-fits-all. Why should your surveys be? Not only do more tailored surveys encourage higher response rates, but they're also just more enjoyable to fill out. The more enjoyable, the more likely people will actually fill it out.
But when you put logic to use, you can also recall information from a survey-taker's previous answers and use that information to steer the journey.
For example, you can recall someone’s name to use it throughout the survey and make the experience feel more personalized. Or, you can recall their answer to a previous question and refer to it in your next question.
Want more insights and tips from the Typeform team? Subscribe to Informed, our monthly newsletter that keeps you up-to-date on industry trends, related opinions, tips and tricks, and other news.
Keep it short, sweet, and specific with branching and calculations
Logic is a pretty powerful tool for personalization—but how does it work? Well, its main function is to send survey-takers down a different "branch" of questions based on their previous responses.
But the best way to explain how it works is to show you. So, let's say you're researching book genres. You'd likely ask which genres your audience reads: fiction, fantasy, mystery, non-fiction, or romance.

If a survey-taker tells you they only read fantasy, you wouldn't want to ask a bunch of follow-up questions about the other genres. So you set up logic to make sure they only see questions about fantasy books.
Here’s what that might look like in action:

You can see the "if-this-then-that" nature of the questions—that’s branching—you send people down one branch or the other, depending on what they say.
But if you want to make your surveys even more effective, add calculations to score leads, determine prices, and more. If you're creating a product recommendation quiz, for example, and you want to let people make purchases within the quiz itself.

You can use calculations to determine the final price based on how much they're buying. You'd first write a quantity question and then set up a calculation, like this:
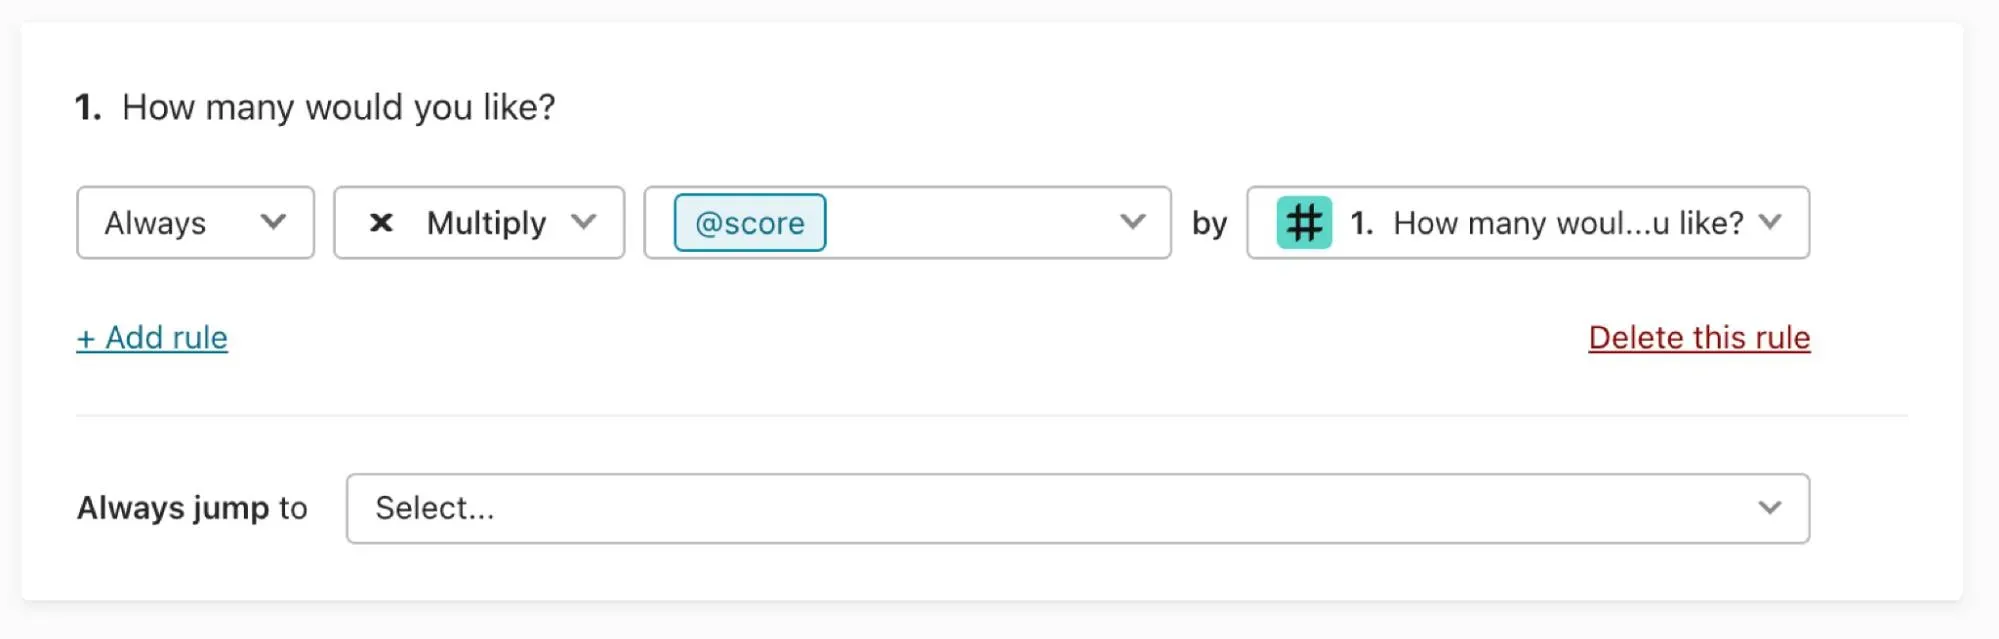
You can multiply, divide, add, and subtract—all depending on what you’re trying to do. This feature tends to be most useful for information like quantity or cost.
Ultimately, the point is to show people only the most relevant information, making for a more engaging survey-taking experience.
Build smarter surveys with maps and jumps
Whether you're a more technical coder or prefer to visualize logic, we've got logic maps and logic jumps to make logic make a bit more sense.
They don't just guide your audience through the survey—they help you structure the logic you want to add to your surveys. Take a look.
Pro tip: More of a visual thinker? Skip to logic maps. More technical? You might prefer to work with logic jumps.
Learn more about adding logic to your surveys here.
Visual learners, meet logic maps
You might already have an idea of how logic can enhance your surveys, but you probably want to visualize the whole thing to make sure it actually works.
A logic map is a visual tool that lets you plot out the structure of the logic paths in your survey so you can preview a survey-taker's experience before you finalize anything.
Logic maps are the perfect way to see the flow of your questions, even as it gets potentially more complicated (on the back end).
Want a detailed tutorial on how to use logic maps? Find one here.
Prefer to code? Try logic jumps
If you’re a coder, you might want to take a more back-end route to build out your logic. You’ll want to use logic jumps.
The three main parts of a logic jump are the “type” and “ref” definitions, the “to” object, and the “condition” object:
- The “type” and “ref” definitions identify which field triggers the logic jump.
- The “to” object identifies which field or screen the logic jump leads to.
- The “condition” object sets the conditions for executing the logic jump.
The “type” and “ref” give the information for the instructions about where the logic jump originates. This could be either the answer to a question or a “hidden field” value (more on those later).
The “to” object tells you where the logic jump leads to—either a new field in the survey, the default thank-you screen, or a custom thank-you screen.
The “condition” tells you when the logic jump should take place—the “this” in “if this, then that.”
For a more detailed breakdown of logic jumps, check out our guide here.
Make your surveys feel more personal with URL parameters
You know how flattering it feels when someone remembers something you told them earlier? That’s the effect URL parameters can have when used correctly in your form or survey.
URL parameters let you recall information that a survey-taker shared earlier and use it within the survey to personalize the experience. For example, if you asked someone for their name earlier in the survey, you can insert it later or make it feel more conversational.

Logic lets you take this up a level. For example, if you add logic to URL parameters, you can do things like:
- Show or hide a form question based on what you already know about your lead or customer (from the data in your database)
- Integrate data from your email management system or CRM to make sure people only see relevant questions
- Create a customized journey for every lead based on a particular audience segment or persona
Let's say you want to send out a survey using MailChimp. URL parameters are the perfect way to tailor the experience for each survey-taker.
You send the customer satisfaction survey with MailChimp. But you want to address each customer by name when they start the survey. Well, if you add the name prompt in the URL using URL parameters, each recipient will receive an email with a unique Typeform URL, like this:
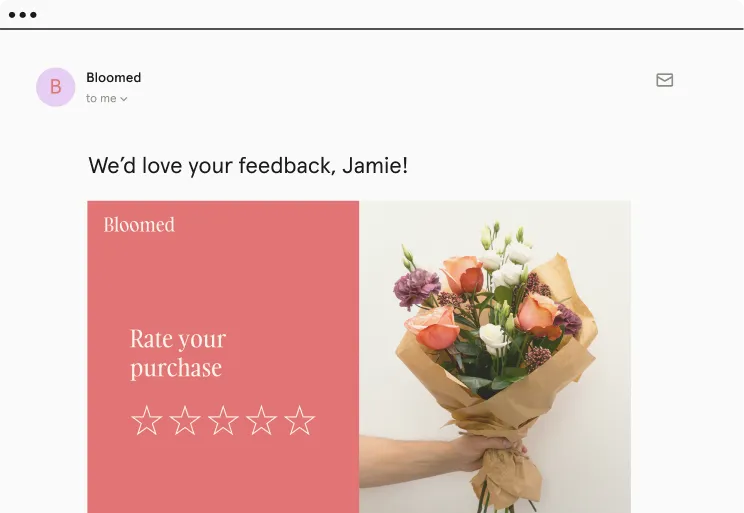
So, if your customer’s first name is Jamie, the URL would be:
https://example.typeform.com/to/nzthWI#name=Jamie
Then you just need to add recall information to the relevant URL parameters, and Jamie will see something like this when they click on the form link in their email:

Names are just the beginning of how you can use URL parameters. You can also capture:
- Email addresses (so you know who completed the survey)
- Details about the lead or customer (like shoe size, so you have that information ready for future transactions through your surveys)
- Where they came from (the traffic source)
Don’t forget about data privacy regulations with URL parameters. Here’s a handy guide to make sure you don’t accidentally cross any lines.
Logic-enriched forms: your best marketing strategy yet
Personalized forms are the secret weapon for gathering customer insights at every stage of the customer journey—or even getting to know your employees better.
According to Deloitte, 67% of consumers say they spend more money when brand personalization is done right—and their research indicates that the interest in (and expectation of) personalization is only going to continue to grow.
It's almost guaranteed that investing in a customization strategy will pay off.
Need some inspiration on how to personalize your surveys? Here are just a few ways our customers use Typeform to gather zero-party data from their customers and colleagues:
- Gathering market research data with short, personalized surveys with built-in logic-based segmentation
- Capturing user feedback and “voice of customer” data to improve their content marketing efforts
- Using quick surveys to collect compelling customer testimonials
- Uncovering workforce engagement data
- Collecting feedback on their new hire onboarding process
- Finding out what their employees really thought about their latest internal events
Logic makes all of this more efficient and effective by allowing for automated segmentation. For example, at Typeform, we use logic when we run our regular net promoter score (NPS) surveys. We used to have two different surveys—one for new customers and one for more established customers. But that created unnecessary complexity.
Now we just send out one email with a single survey, and we use logic—plus our own database information—to segment our customers automatically. This allows us to show them only the questions we want them to answer (based on how long they’ve been a customer).
The result? One survey, one data file, one set of data to analyze, and a less frazzled research team. And, most importantly, lots of lovely customer data so we can make sure we’re keeping every customer happy.
Getting the most out of survey logic
If you follow the “if this, then that” line of thinking, survey logic should be pretty intuitive—especially if you set it up with logic maps.
But there are a couple of tips to make things easier when you’re first getting started—and to boost completion rates.
Plan ahead—before building your survey
Planning to add logic heavily throughout your survey? You'll need to be 100% clear on the survey content and the different pathways before you build anything. Logic helps take survey-takers on a journey—you need to act as the guide.
There’s nothing worse than diving in, starting to build in your logic pathways, then saying to yourself, “Oh, you know what? Maybe we should delete that question. And, let’s stick that one over there. And maybe we’ll change that wording...”
That’s a recipe for breaking all of your logic. It’s a bit like building a wall and then deciding you don’t like the color of one of the bricks at the bottom of the wall.
We highly recommend planning out the entire pathway before you start building logic into your forms. Use a pen and paper or a mind-mapping software to make sure you know where you want the survey to go and what you want the end result to look like.
And don’t forget to get approval from all the stakeholders who are going to use your survey results, too. Confirm that the survey's data will be useful to everyone.
Remember, not all question types are compatible with logic features. You can’t use matrix, statement, phone number, ranking, payment, Calendly, address, or contact info answers as conditions. But you can still use these question types in a survey with branching.
Learn more about the different options and limitations here.
Keep it simple
We’ve said it before, but it bears repeating: keep your surveys under six questions. If you need to ask more questions than that, consider two different surveys—or think about offering incentives to keep survey-takers engaged.
Our research team has found that surveys that are longer than six questions (or that take longer than 10 minutes to complete) have far fewer responses than shorter surveys. Which is another reason to use logic.
Logic makes it easier to keep your surveys short because nobody has to answer irrelevant questions or repeat information they’ve already given you.
Running into issues as you build out logic? Troubleshoot the most common logic issues here.
Survey personalization is one of the best ways to unlock deeper insights into your customers—and keep them engaged. Try logic for yourself to see just how powerful it can be with our survey maker or form builder.
.webp)