Cam Adair used to spend up-to 16 hours a day playing video games – and it nearly killed him. He dropped out of school, lied to his parents about having a job, and sunk into a deep depression.
Ten years ago Cam went cold turkey and quit. He has turned his life around and is now a motivational speaker.
Cam wanted to use his story to help others like him recognize they have a problem and get help. So he set up Game Quitters, a website that helps young people beat gaming addiction. You can read Cam’s story over on the Typeform blog.
The problem
Cam wanted to provide a quick and easy way for people to screen themselves (or a loved one) for video game addiction. He also needed to get their contact details to serve them with helpful content and to raise awareness about the help courses he runs at Game Quitters.
The solution
Cam created a personality test form that asks a series of Yes/No questions to determine if someone has a problem with video gaming. The form asks for an email address, which is sent to Cam’s email marketing software, ConvertKit. He can then send targeted content from Game Quitters to people based on the outcome of the addiction test.

The results
Cam says he has been “blown away” by the results of his form. In the eight months before adding the quiz to the Game Quitters home page, they were averaging 365 new leads per month. In the eight month period after Cam put it front and center they average more than 1,700 new monthly email subscribers new email leads – a 370% increase in signups.
“More importantly,” said Cam, “our quiz has helped more than 8,000 people learn important information about video game addiction.”

Game Quitter’s solution works a bit like this:
- Cam created a personality test with Typeform using calculations and Logic.
- He then embedded this quiz on the Game Quitter’s home page.
- Cam connected the form to Game Quitter’s email marketing application, ConvertKit, which manages all the leads driven by the test.
Try it out for yourself:
The following guide shows you how Cam created the Game Quitters personality quiz. You can use it as an inspiration to create your own test, and bring engaged subscribers to your business.
Part One: Map out the personality test criteria
Before he fired up Typeform and started creating, Cam had some research to do. “My intention with the Typeform was to provide a quick and easy way for people to screen themselves – or a loved one – for video game addiction, so the first step was creating the list of criteria,” he said.
“I spent some time researching the most reputable video game addiction scale, which includes a set of criteria based on nine questions. I also took into consideration this study, which suggested an update to the ‘tolerance’ criteria, and added its recommendations.”
Here’s the final set of questions that Cam would use for the form.

Part Two: Set up calculations and Logic
Having established the questions, the next step was to plug them into a form. In order to assess the person based on their response to the form, Cam made use of calculations and Logic to create a quiz. He would then show a different ending based on their score.
“If someone meets five or more criteria they need to know their situation is more severe than if someone meets four or less,” said Cam. “Having the ability to redirect these separate groups to different information was valuable.”
Here’s how it’s done:
1. The nine questions are all stored within a Question Group. In the Create panel, click + Add content, then select Question Group to get started.
2. Each question in the Question Group is a Yes/No question. To add them, click on the dropdown arrow on your Question Group to expand it, then click + Add content, and chose Yes/No.
3. Enter the question text for your first Yes/No block. Cam made each question required to ensure that the addiction test works properly. He also added a description to the first question for clarification.
4. Add in all the Yes/No questions, making sure that each one is set as Required.
5. Now to add the calculations needed to determine the level of someone’s addiction, based on their answers. For this, set up the Calculations to add +1 to the Score for every ‘Yes’ answer (i.e. every answer that is an indicator for addictive behavior). It should look like this.
6. Once these calculations are set, add an Email question type to the Question Group to capture the person’s contact details. Cam did this so he can send the person helpful content once they’ve completed the quiz.
7. Game Quitters shows the person one of two different messages depending on their answers. To set this up Cam made two Endings. One of these will be shown to people who answer “yes” five or more times, and the other to those who answer less than this.
Start by entering the text you want to appear in the Ending. You can insert the person’s test score into the message by typing the @ sign and selecting Score from the dropdown list.
8. Cam directs people to a landing page on the Game Quitters site once they have finished the test. He made two versions of the landing page, based on whether the person’s gaming activity was deemed concerning or not.

To set this up, Cam used the Redirect to URL feature. To do this, add a button link in the right-hand Question menu. Cam also changed the button text to make it clear to the person that they'll be directed to more information.
9. All that’s left to do is set up Logic to display the appropriate Ending based on a person’s score. Go back to the Logic tab and select Branching and Calculations. Scroll to the question "What is your email so we can send you your results?". Set the Logic so that if the Score variable is greater than or equal to 5, it jumps to Ending A (the one that’s written for those who are an addiction concern). Change the In all other cases jump to dropdown to specify it jumps to Ending B. Like this.
Part Three: Applying the design
Once the Calculator and Logic was all set up, the personality test was working. There were still a few finishing touches left to get the Game Quitters form looking perfect.
1. Cam added a Welcome Screen to the personality test to explain its purpose. “I added a disclosure at the beginning prior to someone answering any questions to ensure everyone filling out the form knew it was meant to be an informal screening tool and not a professional assessment,” he said.
2. For the first few months of its life, the Game Quitters form used one of the default public themes. You can access these themes by clicking the Design tab in the sidebar.
3. Cam later tweaked the design of the form to make it more “on brand”. You can adjust the theme by selecting the three dots in the bottom right corner of the tile, and choosing Edit. From here you can change the font, and the colors of the text, buttons, and background. You can even add a background image, if you like.
Part Four: Embedding the form
To start with, Cam didn’t embed the form on the Game Quitters site, merely linking to it in blog posts, email campaigns, and site navigation pages. When he finally did add it to the homepage, they saw a huge jump in engagement. You can read about the incredible results they got in this article on our blog.
Putting your form front and center on your homepage can be done in just a few steps:
1. Go to the Share panel and click Embed in a web page to see the different modes on how you can embed your form.
2. There are six different embed options to choose from. Cam went for the Standard Embed option for Game Quitters. This allows you to load a form anywhere on a web page.
To set up the embed, select your desired width and height and click Start embedding.
3. Copy the code and paste it into your web page code editor. If you're using Wordpress, Squarespace, Webflow, or Shopify to embed your form, you can select your website builder in the dropdown for specific embedding instructions.
Part Five: Integrating with ConvertKit
The final piece of the puzzle is the integration with Game Quitters’ email marketing software, ConvertKit. This allows Cam to send targeted content to people based on their responses, without having to manually segment the audience.
“When someone completes our form their responses are added and tagged in ConvertKit using an integration with Zapier,” said Cam. “They receive their quiz results and the opportunity to learn more about their situation, based on the level of severity they scored with their answers.”
Here’s how to integrate ConvertKit with Typeform using Zapier:
1. Sign up with Zapier, or log in if you already have an account, then click the Make a Zap! button. The first step is to choose Typeform as the trigger app. Search for it and select it.
2. Select New Entry as the Typeform trigger. This means that the action will occur as soon as a form is completed.
3. Choose the Typeform account you want to connect to by logging in via the prompt in Zapier. Hit the Test button to make sure this connection is working.
4. Now find the form you want to connect to by searching for it or looking through the dropdown list.
5. You can pull in sample responses from your form to make sure that Zapier is working properly. This will also make it easier to set up the connection with ConvertKit later by giving you visual cues via a sample entry.
6. Now that we’ve specified which form we want to grab data from, it’s time to set up ConvertKit to tell it what to do with this information.
Set up two sequences in ConvertKit (you can sign up for a free trial if you don’t have an account yet): one to add subscribers who scored more than five on the test and another for those who scored less than six.
You can tailor the messaging for each sequence based on the person’s needs. If you want you could even schedule multiple emails to be sent over a period of time for each sequence (the example below shows just one).

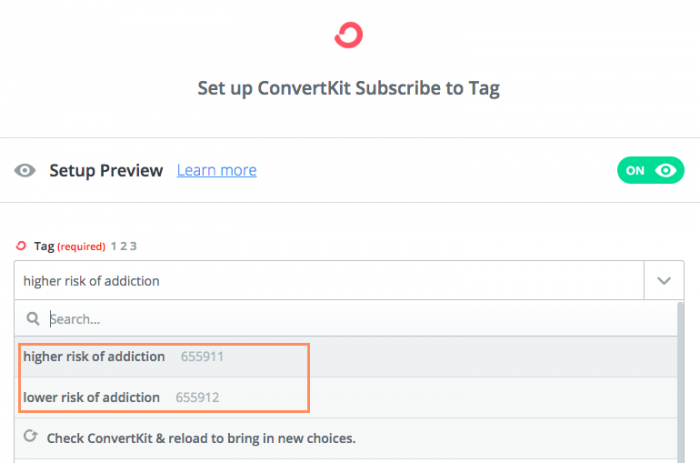
7. Tags in ConvertKit help with segmentation of your subscribers. You can create a different tag for each of the two profiles as shown in the example below. You could even have a different tag for each possible score if you want more granularity.

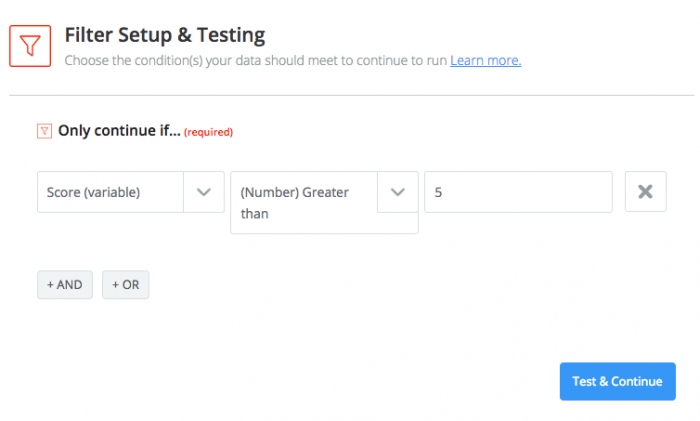
8. Now, let’s set up Zapier to automatically put someone in a Sequence and tag them, based on the Score they get when they complete the form test. Click Add a Step from the right-hand menu and select Filter.
9. We want people who score more than five in the test to be moved to our ‘Higher risk of addiction’ Sequence in ConvertKit, and for them to be tagged accordingly. So set the ‘Only continue if…” condition accordingly and test it out.

10. Now, add an action step to say what you want to happen when this condition is met. The action we want to perform is to create a subscriber in ConvertKit and tag them. Choose ConvertKit as the action app and select Add Tag to Subscriber.

11. Connect to your ConvertKit account through Zapier when prompted. Now, specify which of the tags you want to assign to these respondents from those you set up in ConvertKit.

12. Now select the email address of the subscriber you want to tag. For this, we’ll use the email information we collected in the form. A new subscriber will automatically be created in ConvertKit if this email address doesn’t already exist.

13. After saving, create another Action step. This time we’ll add a subscriber to a specific sequence based on their score in the form test (remember, the “score more than 5” filter has already been applied).

14. Select the sequence that you want to add the subscriber to. In this case, it’ll be the ‘Higher risk of addiction’ sequence.

15. Click the Send test to ConvertKit button. Now hop over to ConvertKit and check that the sample entry was sent across. You should see a newly-created subscriber. Check that: the email address was copied across, that the correct tag was applied, and that the subscriber was placed in the correct sequence.

16. Create a second Zap, repeating steps 8-15….or use Zapier’s logic tool, Paths, which can handle multiple outcomes from a single Zap.

So there you have it: a complete solution for engaging your audience with a quiz, capturing leads, and passing them through to segments of your email marketing software. In Game Quitters’ case, they are helping young people break their addiction to video games and lead more fulfilling lives. Read Cam’s story on our blog.


